

If ever a succulent begged to be sculpted, it’s Aeonium arboreum ‘Zwartkop’—those near-black, glossy rosettes perched on branching, woody stems are practically an invitation to play florist and bonsai artist at the same time. Below is a propagation deep‑dive to help you callus, root, water, and prune your way to a dramatic, multi‑headed specimen that looks like a living candelabra of dark roses.
Know your plant, grow your plan
- Growth rhythm: Strongest from autumn through spring; it often slows or semi‑rests in hot summer weather. That timing matters a lot for propagation and watering.
- Light: Full sun to very bright light. Indoors, give it your brightest window; protect from harsh, magnified midday sun behind glass during heatwaves.
- Temperature: Happy around 10–24°C (50–75°F); strongest growth around 20–25°C (68–77°F). Keep frost‑free; protect carefully as temps approach 0°C (32°F).
- Flowers: Mature rosettes can send up clusters of tiny, yellow, star‑shaped blooms. The blooming rosette typically declines after flowering; side rosettes carry on.
The propagation sweet spot: timing, tools, and prep
- Best season: Autumn to spring is prime. Avoid peak summer heat, when rooting slows and rot risk rises.
- What to cut:
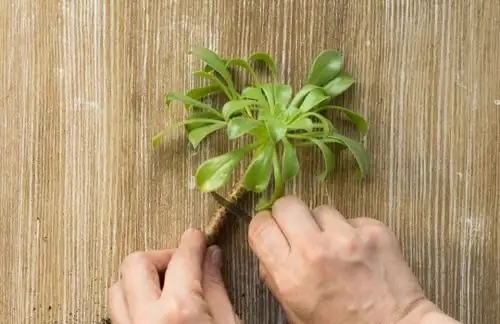
- Stem cuttings with a full rosette are the gold standard (reliable and fast to root).
- Offsets (side rosettes) are equally excellent.
- Single leaves: occasionally root, but success is unreliable. If you try, know it’s a low‑odds experiment.
- Tools and hygiene:
- Use a sharp, sterilized blade or pruners.
- Make a clean cut 7–12 cm (3–5 in) below a rosette.
- Optional: Dust the fresh cut with powdered sulfur or cinnamon to discourage rot.
Callusing: the quiet magic
A proper callus seals the wound, dramatically reducing rot risk once the cutting meets the mix.
- Where to cure: Bright shade with moving air—no direct, scorching sun.
- What “ready” looks like: The cut end turns matte and dry with a thin, leathery skin; edges may slightly roll. No moisture weeping, no mushy smell.
- Timelines (typical):
- Warm, dry room (20–24°C / 68–75°F): 3–5 days for small stems, 5–7 days for thicker cuts.
- Cool rooms (12–18°C / 54–64°F): 5–10 days.
- Troubleshooting:
- If the end darkens and softens, re‑cut above the damage and restart callusing.
- Don’t rush. Planting before a full callus is the fastest way to lose a cutting.
Gritty mixes that root fast and stay safe
Think fast drainage with open pore spaces—air as much as water.
- Reliable mix recipes (by volume):
- 50–70% mineral: pumice/perlite/lava rock/coarse sand (2–6 mm)
- 30–50% base: a standard potting mix (peat/leaf mold) for a touch of moisture retention
- Bonus tweaks:
- For very humid homes, push mineral up to 70–80%.
- Sieve out fine dust that can clog pores.
- Containers:
- Small nursery pots or trays with drainage. Terracotta helps the mix dry faster; plastic holds a bit more moisture.
- Top‑dress with gravel to keep rosettes clean and discourage fungus gnats.
- What to avoid: Dense, water‑retentive soils and oversized pots that stay wet for days.
Rooting conditions dial‑in
- Temperature: 20–25°C (68–77°F) is ideal. Below ~10°C (50°F) rooting slows; above ~28°C (82°F) aeoniums often semi‑rest.
- Light: Bright, indirect light or very bright shade. Too dim = sluggish rooting and stretch; too intense = scorch risk before roots support transpiration.
- Airflow: Gentle movement is your friend—stagnant, damp air invites rot.
- Planting day:
- Insert the callused stem 2–3 cm (about 1 in) deep in dry, gritty mix.
- Firm lightly so the cutting stands upright.
- Do not water yet.

The first drink—and a foolproof watering ramp‑up
- Root check: After 2–3 weeks, a gentle tug should feel anchored. Many cuttings root fully within 3–4 weeks in good conditions.
- First watering: Once roots have formed, give a small, perimeter‑only drink to slightly moisten the outer mix, then let it dry.
- Week‑by‑week ramp:
- Week 1 after rooting: One light watering, then dry through.
- Week 2–3: Increase to a thorough soak with full drainage once the top layer dries.
- Thereafter (active season): Water deeply, then allow the surface to dry before watering again.
- Summer tweak: During hot summer semi‑dormancy, keep the mix almost dry; offer tiny “sips” only if rosettes begin to wrinkle.
Training a sculptural, multi‑headed ‘Zwartkop’
Harness apical dominance: remove a lead rosette and dormant buds below will wake up as new heads.
Year 1: Build the trunk
- Let a vigorous stem extend. Keep light very bright to maintain tight rosettes.
- Clean away a few lowest leaves to reveal a bit of woody stem—your “mini tree” is forming.
The first beheading (the big branch trigger)
- Cut the main stem 10–20 cm (4–8 in) below the rosette, leaving a sturdy stump with several nodes.
- Root the top as a new plant (win‑win).
- On the stump, 2–6 new rosettes typically emerge around the cut within a few weeks to months (faster in the cool season). Keep only the strongest 3–5 for structure.
Staggered beheading for tiers
- Once secondary rosettes have stems of their own, selectively behead some—but not all—at different heights.
- This staggered approach avoids stalling the whole plant and creates tiers, like a dark chandelier.
- Each cut yields another round of branching. Repeat annually or every 18 months during the cool‑active season.
Shaping finesse
- For a compact, architectural look, prune in small doses and always maintain strong light so new heads stay tight, not leggy.
- After flowering, remove the spent (declining) rosette once it dries to redirect energy to side heads.
- Support: Stake young, top‑heavy specimens with a discreet bamboo cane until the woody base thickens.
- Pot choice: Use a stable, well‑drained pot (terracotta or a heavier ceramic) to balance the canopy as the “tree” grows.
Seasonal care that makes propagation succeed
- Feeding: Once new roots are established, feed monthly at half strength during the main growth windows (autumn through spring). Skip summer.
- Light: To keep that near‑black color, grow in sun to very bright light, tempering harsh midday rays during heatwaves behind glass.
- Watering cadence:
- Active growth: Water when the top layer dries—thoroughly, with full drainage.
- Summer heat or cool winter rooms: Keep on the dry side to prevent rot.
Common pitfalls—and fast fixes
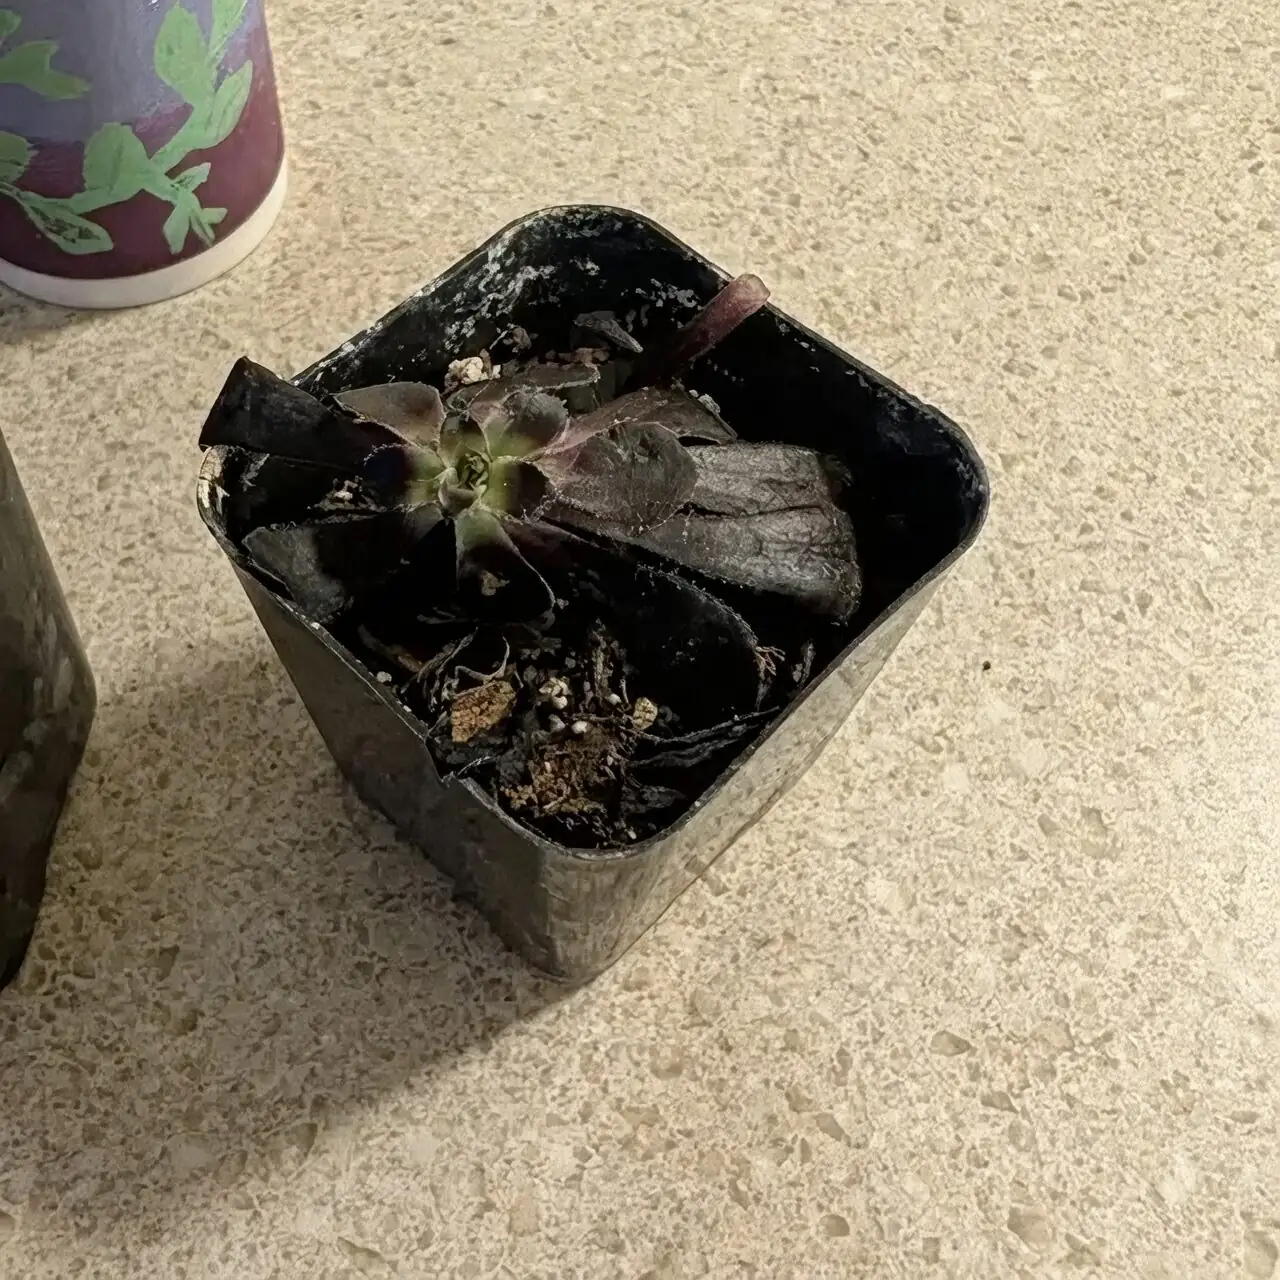
- Cuttings rot at the base:
- Cause: Inadequate callus, overly wet mix, or poor airflow.
- Fix: Re‑cut to clean tissue, extend callus time, replant in drier, grittier mix, increase ventilation.
- Cuttings shrivel and stall:
- Cause: Too dim, too cold, or prolonged dryness before rooting.
- Fix: Move to brighter, warm conditions (20–25°C / 68–77°F). Once roots form, begin light watering.
- Stretchy, pale rosettes:
- Cause: Insufficient light.
- Fix: Move to the brightest window or add strong grow lights; prune back leggy stems to reset structure.
- Summer propagation woes:
- Cause: Dormancy. Rooting is sluggish and rot‑prone in high heat.
- Fix: Delay until temps cool, or keep cuttings very dry and bright until autumn.
Quick‑reference recipes and timelines
- Best rooting temperature: 20–25°C (68–77°F)
- Callus time: 3–7 days (longer for thick stems or cool rooms)
- First watering: Only after roots form (usually 2–3 weeks)
- Gritty mix (by volume):
- 60–70% pumice/perlite/lava/coarse sand
- 30–40% standard potting mix
- Potting: Small pots with drainage; terracotta for faster dry‑down
- Pruning cadence for a multi‑headed form: Initial beheading once you have a sturdy trunk; then stagger selective beheadings every 12–18 months in the cool‑active season
Safety, pests, and hygiene
- Sap can irritate sensitive skin—gloves are smart when pruning.
- Usual suspects: Mealybugs, aphids (especially on flower stalks), whiteflies, and scale. Treat early with insecticidal soap or horticultural oil; repeat as needed.
- The big killer is excess moisture in cool, low light—prioritize fast drainage, bright exposure, and airflow.
Symbolism and display notes
- Symbolism: Often linked with resilience and modern elegance—rosettes that hold their poise even when conditions are bright and dry.
- Display smarts: Open containers with excellent airflow serve ‘Zwartkop’ far better than closed terrariums. For a gallery‑worthy finish, top‑dress with pale gravel to make those dark rosettes pop.
With a little patience in the callus stage, a gritty, airy mix, warmth in the rooting window, and confident pruning, Aeonium arboreum ‘Zwartkop’ transforms from a single, dramatic rosette into a sculptural, many‑headed showpiece—one you can keep refreshing and re‑editing for years by repeating the cycle of cutting, rooting, and shaping.