


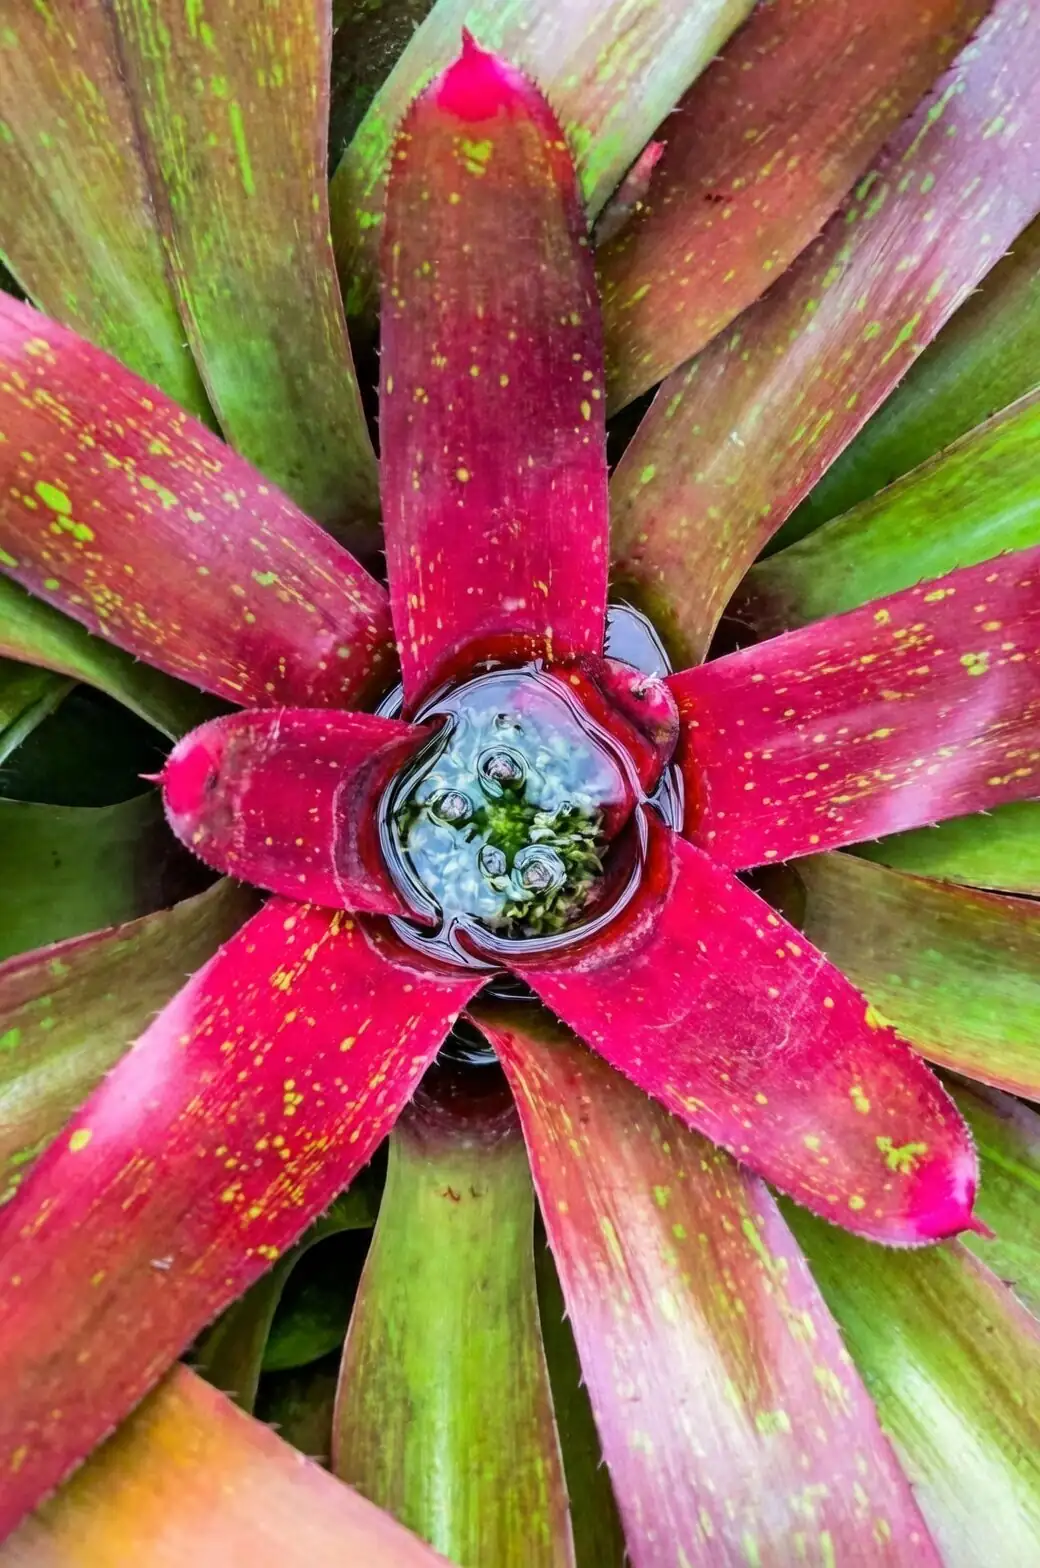
Think of ornamental bromeliads (Guzmania, Vriesea, Aechmea and friends) as sculptural rainforest rosettes wearing long-lasting color. They’re sturdy housemates—until pests or a soggy “tank” invite trouble. Here’s a calm, step-by-step game plan to diagnose, clean up, and prevent mealybugs, scale, spider mites, and cup rot using gentle IPM tactics first—and knowing when it’s time to escalate.
First, set the stage for success
Bromeliads are warm, airy, bright-filtered-light plants that hate soggy roots and stale air. Good conditions make pests less likely and recovery faster.
- Light: Bright, indirect light. Morning sun is fine; avoid harsh midday.
- Temperature: 18–28°C (64–82°F). Keep away from cold drafts.
- Humidity: Moderate to high (about 50–70%) cuts brown tips and discourages spider mites.
- Potting mix: Very free-draining, orchid-bark based with perlite; never waterlogged.
- Watering style: Lightly moisten the mix and drain well. If your plant forms a central “cup” or tank, keep a small amount of clean water there and refresh it weekly; reduce or empty in cool/low-light periods to avoid rot.
The IPM pyramid for bromeliads (what to do, in order)
1) Inspect and quarantine
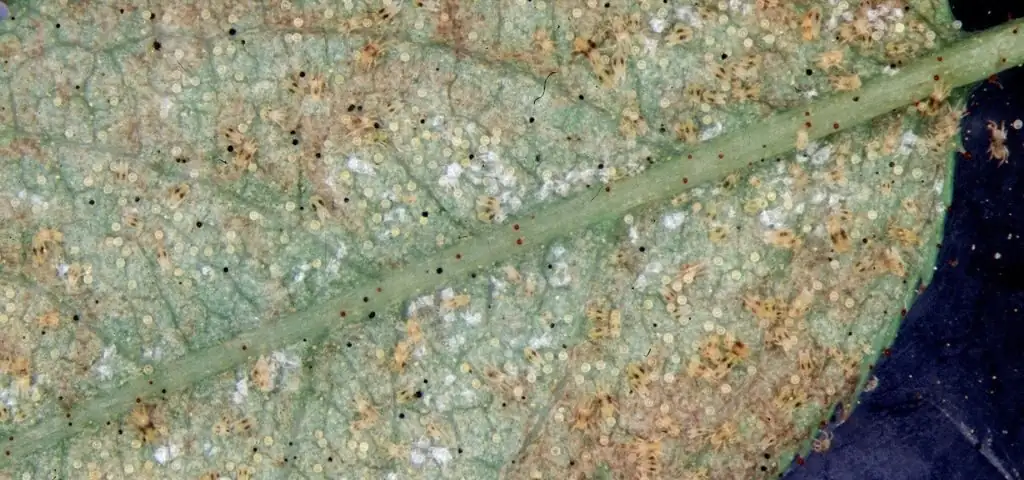
- Look for early clues: sticky leaves (honeydew), cottony tufts in leaf axils, tan/brown “helmets” along midribs, or fine webbing and leaf stippling.
- Isolate affected plants immediately to protect your collection.
2) Cultural and mechanical fixes
- Airflow: Space plants so leaves don’t touch. Run a small fan on low, gently circulating air past—not directly into—the rosette.
- Rinse: A tepid, firm shower targets undersides and axils. Repeat weekly 2–3 times to knock back pests and eggs.
- Manual removal: Use a soft brush, cotton swab, or a plastic card to lift pests off leaves and out of crevices. For tank bromeliads, gently swab inside the cup’s inner leaf bases.
3) Gentle cleansers and spot treatments
- Isopropyl alcohol (≤70%): Dab mealybugs and young scale directly with a cotton swab; test one leaf first and avoid flooding the central cup. This dissolves their protective wax and is very effective on contact.
- Mild soapy water: A few drops of gentle liquid soap in a liter of water helps lift honeydew and sooty mold. Wipe, then rinse. Avoid heavy residues in the cup.
4) Targeted low-toxicity sprays (use thoughtfully on bromeliads)
- Insecticidal soap, neem oil, or lightweight horticultural oil can suppress crawlers (immature mealybugs and scale) and help with spider mites. Always:
- Test-spray a small area and wait 24–48 hours.
- Shield or lightly stuff the cup with a bit of paper towel during application to keep residues out, then remove and refresh with clean water the next day.
- Spray in bright, indirect light (not hot sun) and ensure good airflow as leaves dry.
5) Monitor and repeat
- Re-check every 3–5 days at first, then weekly. Most pests have multi-stage life cycles; two or three rounds of treatment are typical.
6) Escalate only if needed
- If pests persist after 2–3 gentle rounds, consider:
- A different mode: alternate insecticidal soap and a light horticultural oil (with spot testing).
- Predatory mites (for spider mites) in controlled indoor/greenhouse setups.
- As a last resort, a product specifically labeled for indoor ornamental use in your region. Follow the label, protect the cup, and provide excellent ventilation. When in doubt, consult your local extension or a plant health professional.
—
Pest-by-pest troubleshooting
Mealybugs (the cottony squatters)
- What you’ll see: White, cottony clumps in leaf axils, along leaf bases inside the rosette, and under leaves. Leaves may feel sticky from honeydew; sooty mold can follow.
- Step-by-step:
1) Quarantine. Remove heavily infested leaves if practical.
2) Rinse and brush: A firm shower and a soft paintbrush or cotton swab reach the nooks.
3) Spot treat: Dab visible bugs with ≤70% isopropyl alcohol. Avoid wetting the whole leaf until you’ve patch-tested.
4) Follow-up: After 3–5 days, repeat rinse and checks. Clean honeydew with mild soapy water, then rinse.
5) If populations rebound: Add an insecticidal soap or light oil spray focused on crawlers, shielding the cup. Repeat weekly for 2–3 weeks.
Pro tip: Mealybugs love tight, stagnant leaf bases. Improving airflow around the rosette dramatically slows reinfestation.
Scale (the cling-on helmets)
- What you’ll see: Tan to brown dome-like bumps that don’t brush off easily; often line midribs and leaf bases. Honeydew and sooty mold are common.
- Step-by-step:
1) Quarantine. Gently pry off adults with a fingernail or plastic card; collect and discard.
2) Alcohol swab: Dab remaining spots to dissolve wax and hit nymphs in crevices.
3) Follow with a soap or light oil spray (after testing), aimed at crawlers. Shield the cup and rinse residues off leaves after they’ve done their job.
4) Monitor weekly. Repeat treatments to catch new hatchlings.
Pro tip: Avoid over-fertilizing. Tender new growth invites egg-laying.
Spider mites (the dry-air nibblers)
- What you’ll see: Fine stippling and dulling of leaves, especially on undersides; faint webbing in protected spots; leaves feel dusty.
- Step-by-step:
1) Quarantine; boost humidity to 50–70% without over-wetting the cup.
2) Rinse: Thorough, repeated showers under the leaves break cycles. Do this weekly for 2–3 weeks.
3) Wipe undersides with mild soapy water; rinse after.
4) If needed, use insecticidal soap or a miticide labeled for ornamentals (test first). Avoid coating the cup; ensure gentle airflow as leaves dry.
5) For persistent outbreaks in dedicated grow spaces, consider introducing predatory mites. Indoors, they perform best with stable humidity and no broad-spectrum sprays.
Pro tip: Spider mites thrive in hot, dry, still air. Slightly cooler temps, steady humidity, and light air movement tip the balance in your favor.
—
Cup rot (when the bromeliad’s “tank” turns treacherous)
Bromeliads that form a central tank naturally hold water—but stagnant, cool conditions can turn that reservoir sour.
- Early signs:
- Water in the cup smells off; inner leaf bases yellow, then brown.
- The central rosette softens or blackens; the plant may wobble at the base.
- Immediate triage:
1) Drain the cup: Tilt and pour; wick residual moisture with a twisted paper towel.
2) Dry and air: Move to bright, indirect light and warmth (not hot sun). Aim a small fan nearby to keep air moving across the rosette.
3) Pause cup refills: Water sparingly into the potting mix at the rim, letting it drain fully.
4) Clean: Wipe the inner leaf bases with a barely damp cloth and let dry. Avoid harsh disinfectants.
- Prevent relapse:
- Refresh cup water weekly during warm, bright periods; in cool/low-light seasons, keep the cup mostly empty.
- Never let the pot sit in water. Use an airy, barky mix and a snug pot.
- Avoid night-time soaking of the cup. Morning refreshes dry faster.
- If base media feels dense or sour, repot into a free-draining mix with the crown above the substrate line.
If the central rosette is fully rotten, remove it cleanly and nurture any surrounding pups; they’ll carry the torch.
—
Your treatment toolkit (gentle, bromeliad-smart)
- Soft brush and cotton swabs
- Spray bottle with clean, tepid water
- Mild liquid soap (a few drops per liter)
- Isopropyl alcohol (≤70%) for spot dabbing
- Insecticidal soap or lightweight horticultural oil (test first)
- Paper towels to shield or wick the cup
- Small fan for steady, gentle airflow
—
When to escalate
- After 2–3 gentle treatment rounds, you still find fresh crawlers/webbing or expanding colonies.
- More than ~20–30% of leaf area is affected, or the plant is declining despite better care.
- You can’t safely access pests (deep in axils) without a different mode of action.
Next steps:
- Rotate modes (soap then light oil, always with spot tests) and tighten monitoring frequency.
- In specialized indoor setups, try biological controls for mites.
- If you choose a stronger product, it must be labeled for indoor ornamentals. Follow all directions, limit contact with the cup, and ventilate well. When uncertain, consult a local extension service or a plant health professional.
—
Prevention checklist (worth taping to the pot)
- Inspect new plants: no sticky residue, webbing, cotton, or wobbly/blackened centers.
- Space plants for airflow; dust leaves periodically.
- Refresh tank water weekly in warm seasons; reduce/empty in cooler, dimmer months.
- Water the mix lightly and drain; never let the pot sit in a saucer of water.
- Feed sparingly at 1/4 strength during active growth; overfeeding invites pests and dulls bracts.
- Keep temps warm and steady; avoid cold drafts.
Bromeliads are epiphytic by nature—think perches, breezes, and fleeting rain, not mud and murk. Give them that airy life indoors, and even the occasional mealybug or mite won’t stand a chance.