

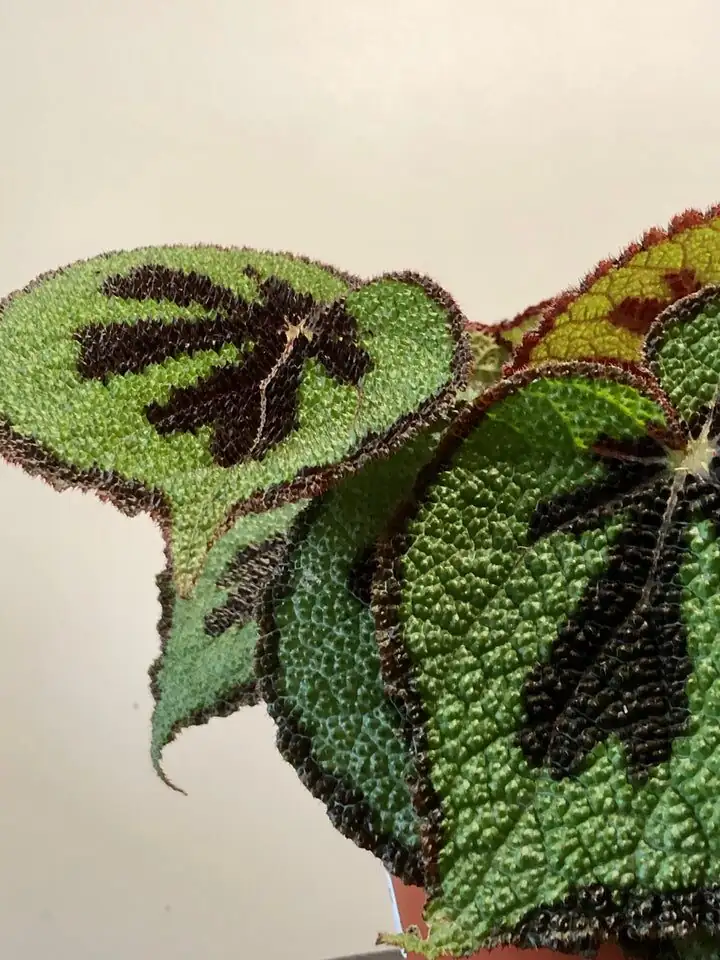
If you’ve ever wished your windowsill could wear a patterned sweater, Begonia masoniana—the Iron Cross begonia—obliges with its bold, dark “X” across soft, mossy-green leaves. Better yet, it’s wonderfully shareable. This is your propagation masterclass: sterile setups, razor-precise cuts, exact rooting timelines (3–4 weeks), and a two-month pot-up plan—plus how and when to divide rhizomes for the fastest, bushiest results.
Meet your plant: compact, dramatic, and rhizomatous
- Botanical name: Begonia masoniana (aka Iron Cross begonia)
- Origin: Southern China and northern Vietnam in cultivation lore; now a beloved houseplant worldwide
- Habit: Rhizomatous, clump-forming, gently spreading; 20–30 cm tall, 30–45 cm wide in a happy pot
- Light & climate: Bright, indirect light (roughly 50–70% shade). Sweet spot is 14–22°C; protect from chilling below 10°C. Loves humidity around 60–70%.
Why this species is a propagation dream:
- Rhizomatous growth makes division straightforward.
- Leaf cuttings strike reliably.
- A single leaf can yield several new plants.
First principles: sterile, airy, and softly bright
Think operating room, not potting shed. Cleanliness, airflow, and gentle light will make or break your cuttings.
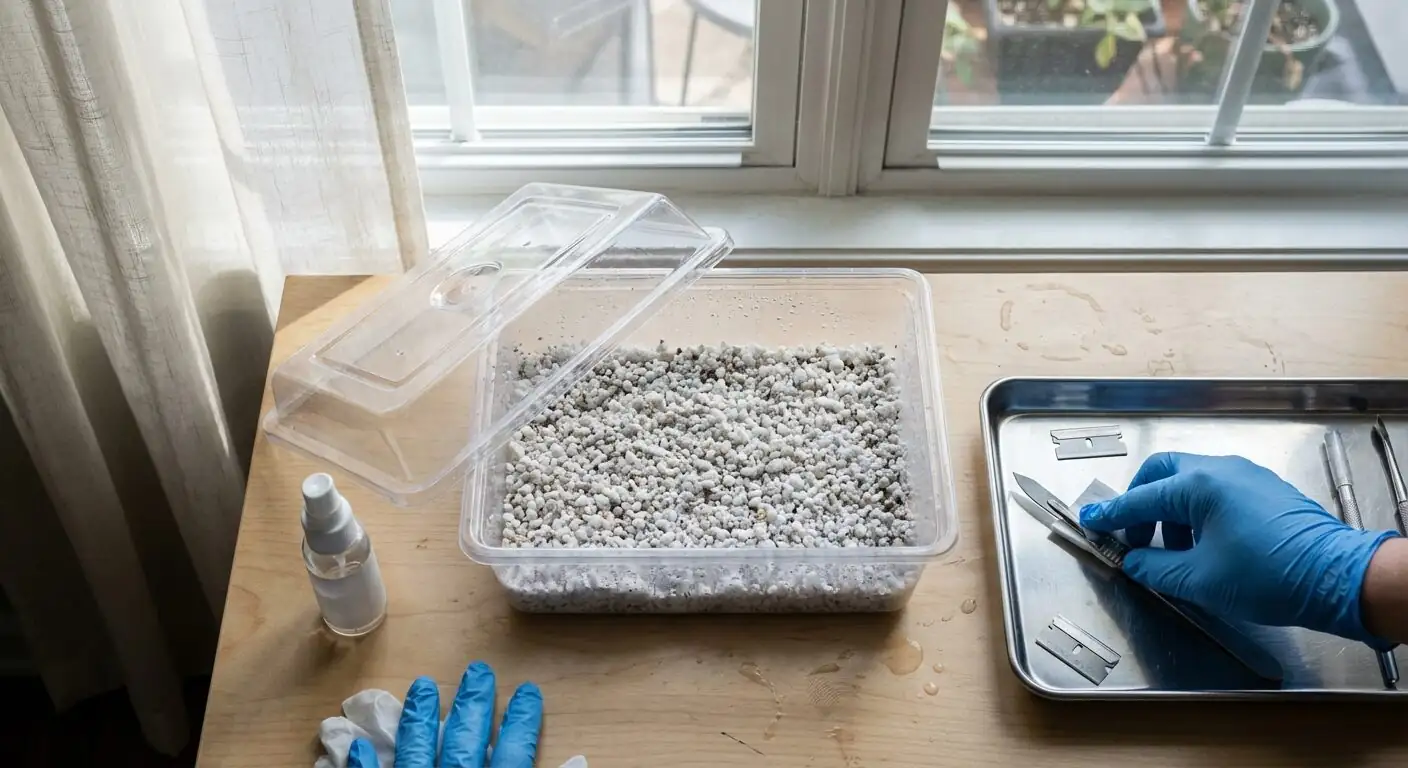
- Tools: New or freshly sharpened razor/knife; sanitize with 70% isopropyl alcohol between cuts.
- Containers: Clear propagation box or lidded tray 7–10 cm deep (3–4 in) for humidity and visibility.
- Medium (sterile and airy):
- Perlite alone, or a 1:1 mix of perlite:vermiculite, pre‑moistened with distilled/boiled‑cooled water.
- For potting up later, keep a loose mix ready: quality potting compost blended with peat or coco coir plus coarse sand or perlite. Always use a pot with drainage.
- Environment: Bright, filtered light (east window or behind sheer), steady 18–22°C, gentle airflow, and 60–70% humidity. Avoid direct sun on tender cuttings.
Leaf-cut masterclass (rhizomatous begonia style)
Early summer is prime time, though any warm, bright period indoors can work.
Option A: Leaf sections inserted upright (precise and tidy)
Best for clean, easily trackable plantlets.
1) Select and prep
- Choose a mature, healthy leaf (unblemished, with a crisp cross pattern).
- Detach the leaf cleanly, retaining about 1 cm (0.4 in) of petiole, then remove the petiole entirely.
2) Cut to size
- With a sterile blade, cut the leaf into sections about 6–7 cm (2.4–2.8 in). Ensure each piece includes strong veins.
3) Planting
- Insert the lower margin of each section about 1–1.5 cm into the pre‑moistened perlite/perlite‑vermiculite mix, keeping part of the leaf above the surface.
- Space pieces so they don’t touch.
- Optional: Dust the cut edge lightly with a rooting hormone if you like; not essential.
4) Humidity and light
- Cover with a clear lid. Crack it open a few millimeters daily for air exchange.
- Place in bright, indirect light—no harsh sun.
5) Watering
- Keep medium evenly moist, never soggy. If condensation pours down the lid, vent a bit more.
What happens next: Expect root initiation in about 3–4 weeks; small plantlets push from the vein edges.
Option B: Vein-slashed whole leaf (maximizes offspring)
Excellent when you want a forest from one leaf.
1) Prepare the leaf
- Remove the petiole flush with the blade base.
- On the underside, make shallow slashes across several main veins (avoid cutting through entirely).
2) Lay and pin
- Lay the leaf flat, slashed side down, on the moistened medium.
- Pin it in firm contact (use sterile hairpins or small wire U-clips).
3) Enclose and tend
- Lid on; vent lightly. Keep the same gentle light, warmth, and humidity as above.
What happens next: New plantlets form at slashed veins in 3–4 weeks.
Rooting care checklist (weeks 0–4)
- Light: 50–70% shade; bright but filtered.
- Temperature: Aim 18–22°C (growth slows notably above ~32°C).
- Humidity: 60–70%. Vent daily to discourage fungal issues.
- Cleanliness: Remove any decaying tissue promptly to sidestep Botrytis and leaf spot.
- Patience: Resist tugging. Check progress by peeking at the medium, not yanking cuttings.
The two‑month pot‑up plan (weeks 6–8)
Your goal is to wait until each plantlet has produced a couple of new leaves and a modest root system. Then:
1) Tease apart gently
- Lift the mother leaf and ease plantlets free. Keep roots intact.
2) Choose pot size wisely
- Start small: 7–9 cm (3–3.5 in) nursery pots prevent overwatering woes.
- For an instant fuller look, you can transplant a few siblings together; they’ll knit into a bushy clump.
3) Use the right mix
- A loose, fast‑draining blend: potting compost + peat or coco coir + coarse sand/perlite. Keep it fluffy—these roots crave air.
4) Planting depth and watering
- Set just deep enough to anchor; don’t bury crowns.
- Water lightly to settle, then keep evenly moist—never waterlogged.
5) Light, feeding, and humidity
- Maintain bright, indirect light; avoid direct sun.
- From April–August, feed every 2 weeks with a balanced fertilizer at label dilution.
- Keep humidity around 60–70%; a pebble tray or humidifier beats misting saturated leaves.
6) Acclimation
- If you grew plantlets under a lid, open it more each day for a week, then remove.
Shortcut to a full, bushy plant: divide the rhizome
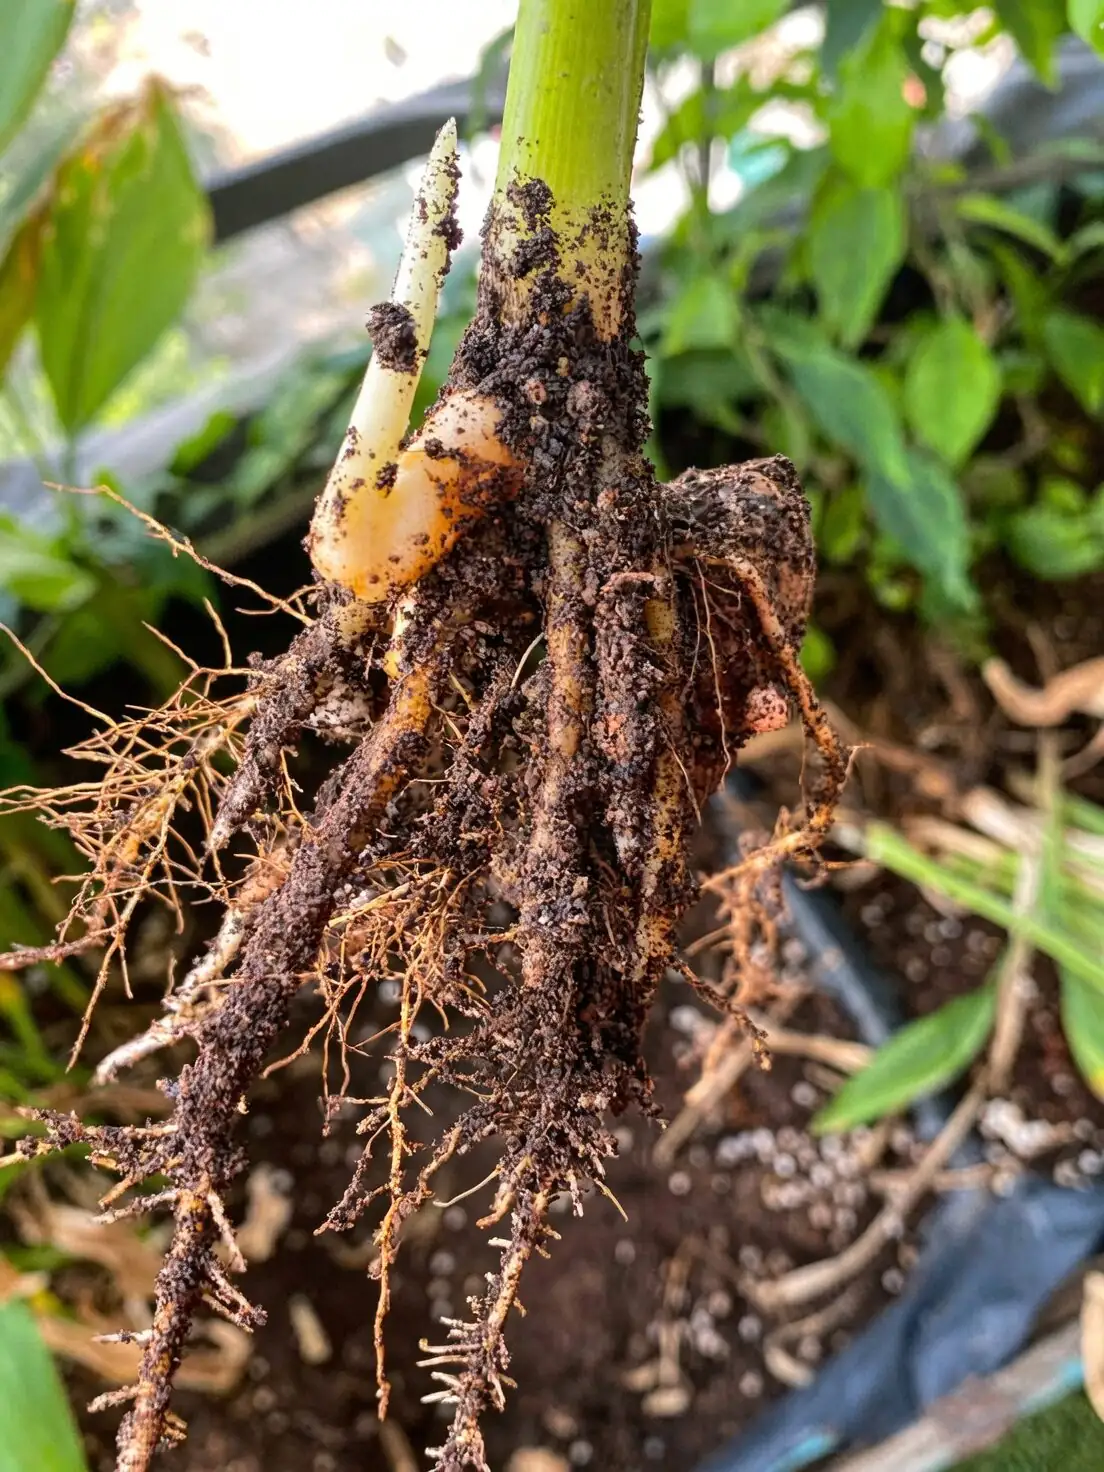
Division is the fastest way to a mature-looking Iron Cross begonia. Time it to spring, ideally during your annual repot.
When to divide (and how much)
- Timing: Spring is best, when growth is reawakening.
- Plant cues: A crowded pot or long rhizomes snaking over the mix.
- Target pieces: Sections about 10 cm (4 in) long, each with a visible growing tip and at least 4–5 leaves.
Step-by-step division for quickest, bushiest results
1) Unpot and assess
- Gently lift the plant; shake off loose mix. Identify natural “breakpoints” between growth segments.
2) Sterile cuts
- With a sanitized blade, cut the rhizome into 10 cm sections, each with a growth tip.
- Let the cut surfaces dry briefly (callus) before planting.
3) Replant as a team
- Pot size: A 12–15 cm (4.7–5.9 in) pot suits a vigorous clump.
- Arrange 2–3 rhizome pieces per pot, spaced like spokes to fill the footprint evenly.
- Set pieces so the rhizome sits at or just above the surface; cover roots but avoid burying the crown.
4) Aftercare
- Water lightly; keep in partial shade until you see fresh leaves.
- Maintain gentle humidity and airflow; avoid drafts and direct sun.
Result: Quicker canopy, more symmetrical growth, and a pot that looks “finished” fast.
Timelines at a glance
- Day 0: Make cuts (leaf sections or rhizome pieces), set in sterile medium.
- Week 1–2: Callusing and early initiation; keep steady humidity and brightness.
- Week 3–4: Rooting becomes evident; tiny plantlets emerge from leaf veins.
- Week 6–8: Pot up when each plantlet has a couple of fresh leaves. Divisions should be pushing new growth.
- Month 3+: Begin shaping; thin a few older leaves at the base for airflow and to encourage fresh foliage.
Troubleshooting the tender stage
- Yellowing or scorched patches? Usually too much sun, cold shock, or dry air. Shift to brighter-but-filtered light, keep above 10°C, and raise humidity toward 60–70%.
- Botrytis/powdery mildew: Improve airflow, vent the dome daily, and avoid wetting foliage. Remove affected tissue promptly. If needed, use an appropriate fungicide as labeled.
- Rotting cuttings: Your medium may be too wet or not sterile enough. Reset with perlite/vermiculite and distilled water; cut back watering.
- Pests (scale): Dab or spray with horticultural oil or insecticidal soap; repeat as directed.
Quick care that powers propagation
- Light: Bright, indirect (50–70% shade). East- or north-facing exposure is ideal.
- Water: Evenly moist in active growth; never soggy. In summer, many growers water every 3–4 days—adjust to pot size and drying speed. In winter, growth often rests—water very sparingly to prevent rhizome rot.
- Temperature: Aim for 14–22°C; protect from hot/cold drafts. Growth slows in extreme heat and leaves can chill below 10°C.
- Humidity: 60–70% keeps those soft leaves pristine.
- Repot: Yearly in spring; divide if crowded; replant offsets that already have 2–3 good roots and some leaves.
- Safety: Considered toxic if eaten (especially rhizomes) and may irritate sensitive skin. Keep away from pets and little hands; wash up after handling.
A note on symbolism
There’s no codified “flower language” for Begonia masoniana, but many plant lovers read its bold, dark cross as a signature of quiet strength—beauty that thrives in shade. It’s also long been a “friendship plant” in practice: easy to share by leaf or rhizome, it travels from one windowsill to another as a living gift.
Ready to multiply that dramatic foliage? With sterile media, smart cuts, and a steady hand on humidity and light, your Iron Cross begonia will reward you in weeks—not months—and fill its pot in no time.