


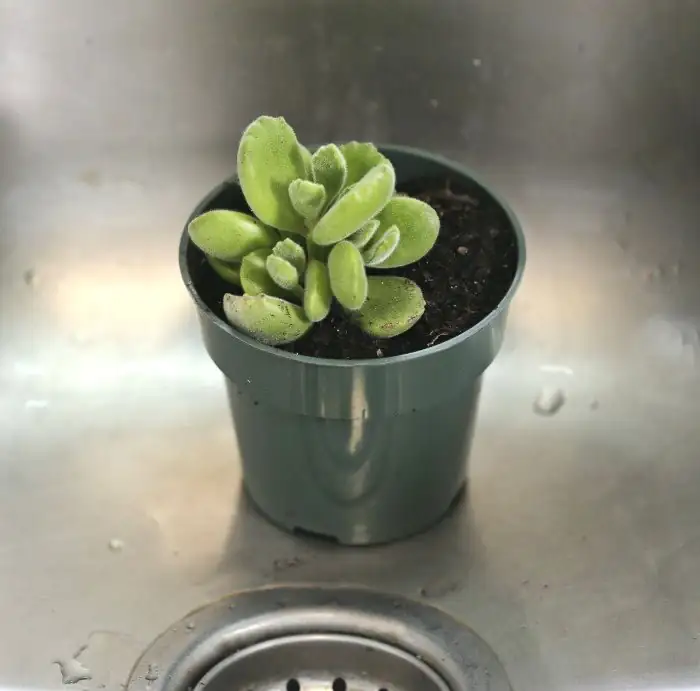
If you’ve ever run a fingertip across a Bear’s Paw succulent and felt those soft, velvety “toes,” you already know why Cotyledon tomentosa steals hearts. Outdoors in warm climates, it’s a compact, branching charmer—until monsoon-like rain, muggy still air, or blasting midday sun gang up on it. The winning play isn’t a sealed greenhouse or daily misting (please no!). It’s simple, clear rain-covers and airflow-first mini-shelters: block the long soaks and the harshest rays, but keep the breeze moving so those fuzzy leaves dry fast and stay spotless.
Meet the plant: small, fuzzy, and deceptively tough

- Botanical name: Cotyledon tomentosa (Bear’s Paw, Bear’s Paw Succulent, Woolly Cotyledon)
- Origin: Southern Africa (especially South Africa)
- Family/Genus: Crassulaceae / Cotyledon
- Look: Plump, paw-shaped grey-green leaves cloaked in short velvet hairs; tips notch into “toes” that blush red in strong light—your cute “claws”
- Habit & size: Compact, branching subshrub; often 10–20 cm tall and 10–30 cm wide in containers, older plants can reach 20–50 cm tall
- Flowers: Small, warm-toned, bell-like blooms held above the foliage; most likely in spring and/or late summer into autumn with bright light plus a cooler, drier rest
Sun and heat: bright mornings, filtered middays
Think of light like a gentle wakeup, not a noon-day interrogation.
- Best exposure: Several hours of sun, ideally morning, then bright indirect light. In very hot climates, shield from intense midday/afternoon sun.
- Acclimation: Step plants into stronger light over 10–14 days to avoid leaf scorch.
- Signals:
- Too little light: Stretched, leggy growth, wider internodes.
- Too much midday heat: Scorched patches, leaf edge crisping; tips may redden nicely in strong light, but don’t chase color at the expense of leaf health.
Why airflow beats “mini-greenhouses” for Bear’s Paw
Those adorable leaf hairs help the plant conserve water and deflect sun—but they also hold onto droplets. Wet, stale air = spotting and rot.
- Keep foliage dry: Water soil directly; never mist fuzz.
- Encourage fast drying: Breeze plus open-sided cover; avoid sealed cloches in warm weather.
- Rule of thumb: If condensation forms inside a cover at noon, ventilation is insufficient.
Outdoor rain-and-sun protection that breathes
Here are simple, low-tech shelters that stop prolonged rain and tame midday rays—without trapping humidity.
1) The floating eave (clear, sloped roof with open sides)
- Materials: Clear corrugated polycarbonate (or acrylic), 2–3 spacers/blocks, sturdy anchors.
- How-to:
- Mount or rest a panel 20–30 cm above plant tops with a 10–15° slope for runoff.
- Leave all sides open; orient the low edge away from prevailing rain.
- Add 30–40% shade cloth midday (clip-on, removable).
- Why it works: Maximum airflow and fast dry-down, zero fogging around leaves.
2) Vented A-frame “rain ridge”
- Materials: Two clear panels hinged along a top ridge; simple end stops; bricks or stakes.
- Setup:
- Create a peaked roof and leave a permanent 2–4 cm vent gap along the ridge.
- Keep sides completely open; stake well for wind.
- Perks: Excellent drainage, strong sun diffusion, built-in high vent keeps humidity from pooling.
3) Lean-to awning on a wall, fence, or balcony rail
- Materials: One clear panel, brackets, gutter or drip edge optional.
- Setup:
- Fix 30–45 cm above the bench with a good slope; position plants on a mesh shelf beneath.
- Clip shade cloth for the noon window only.
- Perks: Uses existing structure for stability; gutter keeps splatter off fuzzy leaves.
4) Patio-table “rain deck” (thrifted favorite)
- Materials: Glass-topped metal patio table(s).
- Setup:
- Slide pots underneath; elevate on bricks for headroom.
- Keep all edges open; wipe glass periodically for light clarity.
- Perks: Ultra-sturdy, airy, and often cheaper than new roofing panels.
5) Minimalist hoop cap with roll-up sides
- Materials: Two or three low hoops (PVC or metal), a narrow strip of greenhouse film across the top only, binder clips.
- Setup:
- Cover just the crest of the hoops (a “top hat”), leaving 60–80% of the sides open.
- For storms, clip down temporary side skirts—then roll back up as soon as rain passes.
- Perks: Storm protection on demand without day-to-day humidity traps.
What not to do:
- Fully enclosed plastic tents, storage bins, or sealed domes in warm weather. They create warm, wet still air—perfect for leaf spot and rot.
Airflow hacks that matter
- Elevate: Use mesh benches, milk crates with wire shelves, or pot feet; avoid flat trays that collect runoff.
- Space: Leave a thumb’s width between leaves of neighboring plants.
- Cross-breeze: Position shelters to catch prevailing wind; on still balconies, a small clip-on fan on a timer (daytime only) helps after storms.
- Drain the perimeter: Gravel strips or a slight slope under benches prevent splash-back and puddles.
Watering outside: soak-and-dry with a rainy-season twist
Bear’s Paw is forgiving of missed waterings, not of staying wet.
- Method: Water thoroughly, then wait until the mix dries well before repeating.
- Seasonal rhythm:
- Spring/Autumn: Sparing, steady cycles—never keep soil continuously moist.
- Peak summer heat: Counterintuitive but important—reduce frequency and shield from heavy rain; extreme heat slows uptake.
- Winter (above 10°C / 50°F): Keep very dry; water lightly only if leaves wrinkle.
- After rain:
- Tip and drain: Gently tilt pots to pour out trapped water from rims.
- Skip the “makeup” watering—let the mix dry well first.
- Never mist: Water on fuzzy leaves leads to spotting and disease.
Soil and pots built for storms
- Mix: Very well-draining succulent mix—practical 1:1 ratio of organic potting soil to mineral grit (pumice, perlite, coarse sand, or grit).
- Pot choice: Always use drainage holes. Terracotta speeds dry-down; plastic retains moisture longer—adjust watering accordingly.
- Top-dress: A thin layer of pumice or coarse grit keeps leaf bases dry and soil from splashing.
- Avoid: Heavy, peat-dense, water-retentive mixes; saucers that fill during rain.
Feeding, pruning, and shaping
- Fertilizer: Light monthly feeding in active growth (spring through early autumn) with a diluted, low-nitrogen succulent formula; bloom-leaning (e.g., 15-15-30) works well at reduced strength. Stop in winter or any time the plant is stressed.
- Pruning: Pinch or tip-prune around 15 cm (6 in) tall to encourage branching. If leggy, cut back to reshape.
- Refresh cycles: Many growers restart older plants every 4–5 years from fresh, healthy cuttings.
Propagation that fits your climate

- Best bet: Stem cuttings in spring or autumn.
- Take 5–7 cm (2–3 in) firm tip cuttings.
- Let cuts callus, then place in a gritty medium.
- Rooting typically in 14–21 days at 18–22°C (64–72°F) with bright light and airflow.
- Leaf propagation: Possible but slower and less predictable.
- Timing tip: Avoid rooting cuttings during prolonged muggy heat waves or rainy spells; wait for a bright, airy window.
Seasonal playbook for warm zones (outdoor-friendly)
- Spring: Repot if needed; resume gentle soak-and-dry; begin light monthly feeding; take cuttings.
- Summer: Strong light with midday shade; prioritize airflow; reduce watering in extreme heat; protect from heavy rain and never let water sit on leaves.
- Autumn: Keep bright; great time for cuttings; begin dialing back watering as nights cool.
- Winter: Brightest possible spot; keep above 10°C (50°F); keep almost dry; no feeding.
Note on hardiness: Not frost hardy. Outdoor year-round growing is generally limited to warm regions around USDA Zone 10–11 (sometimes listed to 12 with warm, dry microclimates).
Troubleshooting outdoors
- Leggy growth: Light too weak—move brighter, acclimate gradually, keep on the dry side, feed lightly at most.
- Sunburn vs. color: Red “claws” come from bright light and drier cycles. Brown, crispy patches signal too much direct, intense sun or abrupt exposure.
- Leaf spotting/rust: Usually humidity plus wet fuzz. Improve airflow, keep foliage dry, trim affected leaves, correct watering.
- Root rot: Wet, heavy soil is the usual culprit—repot into a gritty mix, reduce watering.
- Pests: Mealybugs and whiteflies show up where airflow is poor. Isolate and treat with insecticidal soap or horticultural oil; repeat as needed.
Safe keeping (pets, kids, you)
Toxicity for Cotyledon tomentosa isn’t consistently documented. Play it safe: treat as potentially irritating/toxic if ingested. Keep out of reach; avoid tasting; wash hands after handling if you’re sap-sensitive.
Smart siting and good neighbors
- Placement: East-facing porches, bright balconies, and under airy awnings shine.
- Companions: Pair with other arid-loving succulents that share the same dry-down schedule. Avoid sprinkler overspray and thirsty, humidity-loving neighbors.
Quick answers
- How do I get the little red “claws”? Strong light plus drier cycles—morning sun, midday shade in hot regions, and excellent airflow.
- Why is my Bear’s Paw leggy? It needs more light. Acclimate to a brighter spot, avoid constant moisture, and feed lightly during active growth.
- New purchase care? Bright light with airflow, water only after the mix dries well, and shade during extreme summer heat. Keep warm and bright in winter (above 10°C / 50°F).
A tiny note on symbolism
With its plush, paw-like leaves and compact, companionable shape, Bear’s Paw is widely read as a symbol of comfort, warmth, and playful companionship—like a small friend perched by the window or on a sunny balcony. The “claws” blush red under good care, a quiet badge of resilience rather than aggression: gentle strength in a tiny, fuzzy package.
One last nudge: airflow first
If you remember only two things, let them be these:
- Keep the rain off and the midday sun tempered with simple, clear, sloped covers.
- Keep the air moving and the leaves dry. Your Bear’s Paw will stay compact, fuzzy, and gloriously claw-tipped—no spots, no rot, all charm.