

If your ti plant’s dazzling reds and pinks have drifted to dull, tired green, don’t toss the lei just yet. Cordyline fruticosa can bounce back beautifully with a targeted refresh: loosen those cramped roots, reset the soil, dial in bright filtered light, and feed for color (easy on nitrogen, generous on potassium). Here’s your step-by-step color-revival plan—with realistic timelines—so you know exactly when to expect the glow-up.
Meet the plant behind the color
- Botanical name: Cordyline fruticosa (family Asparagaceae), also called ti plant, Hawaiian ti, or good luck plant
- Native range: Southeast Asia through the western Pacific; widely grown across the tropics
- Look: Upright, cane-like stems crowned with long, arching, strap-shaped leaves in greens, burgundies, pinks, and flashy variegations
- Habit: As stems lengthen, older leaves naturally yellow and drop; tip-pruning encourages branching and a fuller crown
- Indoors size: About 40 cm–1.5 m (16 in–5 ft), depending on pot and pruning
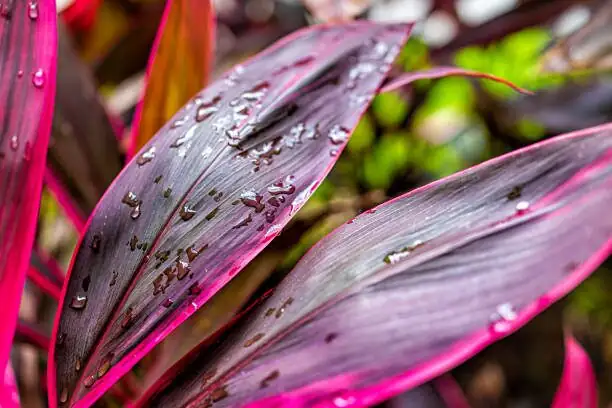
Why that color matters: ti is grown primarily for its foliage. Leaf brilliance is your health bar—when conditions slip, color usually fades first.
Why color fades (and how to spot the cause)
- Root-bound or old, exhausted mix: the most common culprit; nutrients and aeration run low, and leaves muddle in color
- Dim light or harsh, direct midday sun: low light dulls variegation; hot sun scorches leaf edges
- Nutrient imbalance: excess nitrogen pushes greener, softer growth; adequate potassium supports leaf quality and saturation
- Water stress: prolonged dryness causes leaf drop; waterlogging triggers yellow tips and root trouble
- Cold snaps: below 5°C (41°F) can scorch or rot leaf edges
The 4-part color-revival plan (with timelines)
1) Repot and refresh the root zone
When: Best in spring; every 2–3 years or whenever color fades and roots circle the pot.
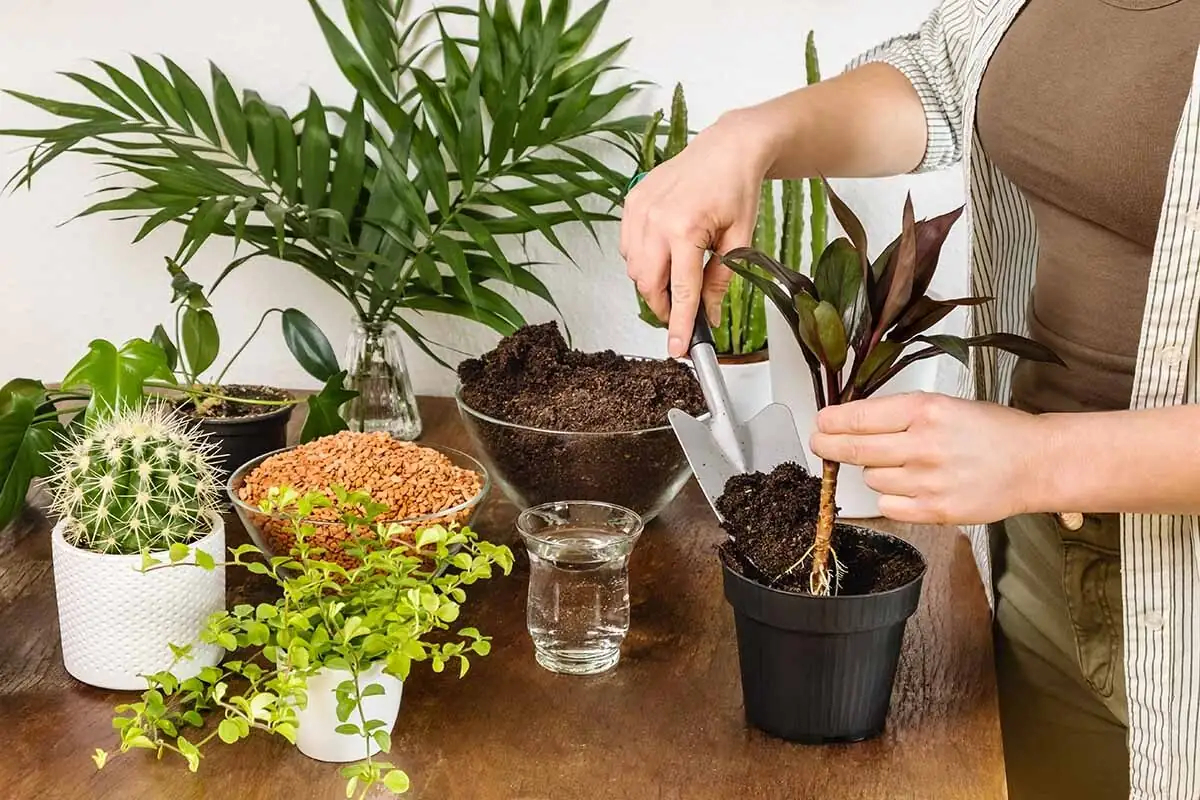
- Pot: Choose one just a size up (roughly 2–5 cm / 1–2 in wider). Always use drainage holes.
- Mix: Fresh, airy, free-draining blend—quality potting soil + a bit of compost or leaf mold + coarse sand or perlite. Aim for springy, oxygen-rich texture.
- Roots: Slide the plant out, tease apart circling roots, and lightly trim damaged tips with clean pruners.
- Planting depth: Set the root ball so the top sits about 2–3 cm (1 in) below the rim; backfill, then water thoroughly and drain.
Timeline:
- Days 3–10: Leaves perk up as roots re-oxygenate.
- Weeks 3–6: New leaves emerge with noticeably cleaner lines and brighter tones.
- 6–12 weeks: Full “before/after” impact as several fresh leaves mature.
Pro tip: Don’t jump too big in pot size—oversized pots dry slowly and invite root issues.
2) Give it bright, filtered light
- Ideal spot: A bright east window or a south window with a sheer curtain—sun-kissed mornings, gentler light midday.
- Avoid: Prolonged harsh midday sun (scorch) and long-term deep shade (faster leaf aging and browning).
- Rotate: Quarter turn weekly for even color.
Timeline:
- Weeks 2–4: Tones deepen on newest leaves; variegation sharpens.
- Ongoing: If new leaves emerge greener than expected, increase brightness (still filtered).
3) Water for steady momentum, add gentle humidity
- Moisture rhythm: Water when the top 2–3 cm (about 1 in) of mix is dry. Drench thoroughly; empty the saucer—never let roots sit in water.
- Avoid extremes: Don’t let it fully dry out for long; don’t keep it perpetually soggy.
- Humidity: Aim for 50–60% to keep edges smooth; a nearby humidifier or grouped plants help.
Timeline:
- Weeks 2–3: Browning from dryness or sogginess slows; new edges grow cleaner.
4) Feed for color: balanced, with a potassium tilt
- Season: Feed during active growth (roughly May–September).
- Formula: Use a balanced liquid fertilizer (or foliage-plant feed) at label strength every 2 weeks. Go easy on nitrogen-heavy products (they can green-out variegation), and ensure potassium (the K) isn’t the lowest number—adequate K supports leaf quality and depth of color.
- Pause: In winter or cool rooms, stop feeding.
Timeline:
- Weeks 3–8: New leaves show richer hues; overall plant looks tighter and glossier.
- By 8–12 weeks: Color stably “holds” as multiple K-supported leaves mature.
A quick diagnostic: what you see vs. what to do
- Faded, muddy leaves + roots circling pot: Repot into fresh, airy mix; resume balanced feeding.
- Pale new growth in good soil: Increase filtered light; check that K in your feed is adequate.
- Brown tips despite good light: Even out watering; bump humidity to ~50–60%; ensure no water sits in the saucer.
- Edge scorch or blotches after a sunny day: Add sheer curtain; shift out of midday sun.
- Sudden leaf collapse in a cold room: Keep above 5°C (41°F), ideally 20–25°C (68–77°F).
Prune and shape for a fuller crown
- Routine: Remove naturally yellowing lower leaves as stems elongate.
- Rejuvenation cut: If legginess sets in, cut stems back; new shoots typically sprout just below the cut, creating a bushier crown.
Timeline after a cutback:
- Weeks 3–6: Visible side shoots form.
- Weeks 8–12: Plant reads fuller, color on new leaves is strongest.
Your season-by-season cheat sheet
- Spring: Prime time to repot; begin biweekly feeding; ideal for air-layering (May–June).
- Summer: Bright, filtered light with midday shade; maintain 50–60% humidity; take stem cuttings (June–October).
- Autumn: Keep light bright as days shorten; reduce feeding as growth eases.
- Winter: Bring indoors if chilly; keep above 5°C (41°F); reduce watering; pause fertilizer in cool rooms.
Propagation options
- Stem cuttings (early summer to autumn): Take 10–15 cm (4–6 in) semi-mature tips, keep 5–6 leaves and shorten them by half; root in moist sand/perlite. Expect roots in ~4 weeks.
- Air-layering (late spring to early summer): Ring-bark ~1.5 cm (0.6 in) wide below the tip, wrap with moist sphagnum and plastic; roots in ~5–6 weeks.
- Seed (when ripe, often around September): Warm germination at 24–27°C (75–81°F) with sprouts in about 2 weeks.
Note: Some growers start short cuttings in water, then pot them into an airy mix once roots form.
Pests, diseases, and how to keep leaves flawless
- Scale insects: Look for bumps or sticky residue; treat early with horticultural oil or insecticidal soap and repeat as needed.
- Leaf spot/anthracnose: More likely with wet leaves and stagnant air. Improve ventilation, water the soil not foliage, and remove affected leaves.
- Quarantine new plants: Prevents hitchhikers from spreading.
Safety
- Keep out of reach of pets (especially cats and dogs). Chewing can cause drooling and gastrointestinal upset.
Culture, symbolism, and “good luck”
Across the Pacific—especially in Hawai‘i—ti leaves have long been woven into decoration, adornment, and ceremony. The plant is widely kept as a “good luck” companion at home. While not a flower-language tradition in the strict sense, the modern “good luck” meaning likely springs from its visible vigor and long cultural presence in protective garlands and festive displays. In that context, restoring a ti plant’s color isn’t just cosmetic—many growers see it as restoring good energy to the room.
When to expect a full color comeback
- Week 1: Leaves stand a bit prouder after repotting and improved watering rhythm.
- Weeks 3–6: New leaves unfurl with cleaner lines and richer pinks/reds under bright filtered light.
- Weeks 8–12: Several new, potassium-supported leaves mature—this is the big reveal window when the plant looks transformed.
Stay patient, keep the light bright-but-gentle, and feed smart. With fresh, airy soil around unbound roots and a sensible fertilizer strategy, Cordyline fruticosa returns to its island-best wardrobe—no passport required.